
self-improvement, photography style.
Read MoreFive [+2] Sheets with Shanghai GP-3 - Shutdown 1 Edition
2020 is winding down, and good riddance. December is a good time to scrub the decks, wash our hands, and sweep out the old. With that in mind, I’m posting this piece from the first shut down. I’m now in our second shut down as we enter what we hope is the home stretch to saner leadership and the new normal, whatever that might be. I wish everyone health, happiness, and success in endeavors, both big and small.

My venerable Series C
It began as it often does with a camera. In this case, a 3x4 Graflex Series C. I will restrain myself from extolling its virtues but suffice it to say I love this camera, and while roll-film backs are handy, I desired to use it in all its 3x4 fullness. Ilford makes film this size (3 1/4 x 4 1/4) in their annual special run, but the price was a bit beyond my budget. I wasn't quite ready to go down the road of cutting down 4x5. As of yet, more on that later. On Facebook, I came across a Hong Kong dealer who offered Shanghai film in several unconventional formats, so I contacted them about the 3x4. Yes, they have it, and as the price was excellent, I impulsively ordered 600 sheets.

3x4 Bag Mag + GP3
On to testing: The film doesn't come with much data, but no matter. I planned to use my go-to developer, Pyrocat HD. I loaded up a few sheets, exposed them at EI 100, and developed them in Pyrocat 1:1:50 at 9 minutes at 20º C. Not bad, but pretty contrasty, and the shadows were thin. On the next round, I went with EI 80, developed for 8 minutes. Much better but still rather contrasty. If you like high contrast, this film will certainly get you there. One more round at EI 64, developed for 7 minutes. It looked good, contact printed well, so there it is.
When the pandemic hit, I had the opportunity to photograph just for myself, albeit close to home, and I found that to be a centering experience. I engaged with scenes near home and focused the tumult of anxious emotions into something tangible, a welcome respite. Also welcome, the "something tangible" was having the opportunity to make prints from these 3x4 negatives and to get a better feel for this film. These photographs are all 7x9 inch prints on Oriental Seagull FB paper. My conclusion is that GP-3 is quite lovely, with fine grain and the capability to render a full tonal range.
One final note on this film, just before our shutdown, I had a test shoot with some friends in the daylit studio as a trial for a portrait shoot that was not meant to be. With an EI of 64 and lenses ranging from f4.5 to f2.9, my shutter speeds fell on the dangerously slow side. So now I've invested in a guillotine-style cutter to chop down faster emulsions for the next studio round. Cameras lead you down many unexpected paths.


The set up, on a beautiful May day on the other side of time. May, 11, 2019
Testing the latent image capability of Ilford Pan-F+
It's no secret that I'm a big fan of Ilford's Pan-F+ film. Last year I decided to answer for myself the one question that seems to dog this emulsion: is it critical that you develop it soon after exposure? In other words, will the latent image deteriorate if you don't get it processed quickly? Many people seem to believe so; it's a piece of advice you frequently hear when Pan-F is mentioned. I admit to saying so myself.
Indeed, This is what Ilford says: "Important Note: Once exposed, process PAN F Plus as soon as practical – we recommend within 3 months." Compare that to what they say in the FP-4 datasheet: "Once exposed, process FP4 Plus as soon as practical." So people give this advice, but based on what data? I'm sure Ilford has the numbers, but short of that, what does it mean for me? Are three months truly safe? What does one month look like, or six months? One way to find out: test it.
Methodology
I exposed a fresh, factory-loaded 36 exposure roll of 35mm Pan-F to the same scene at the same exposure. I then snipped a few frames and developed that film the same day. I put the remaining film in a secure location, on my darkroom shelf, keeping real-world conditions. I did another snip test two weeks later, and then at the one month, six weeks, two months, four months, eight months, and finally one-year intervals. You can see by the specific dates my breaks were not perfect. It's not always possible to get to the darkroom when one desires, but I kept it close enough.

The exposure.

TTV

Backed up by my trusty spot meter, I placed the grey siding on Zone VI.
The developer was Rodinal, developed at my standard dilution and time of 1:100 for 10 minutes at 70º F. That has been my go-to combo since my school days. I have some thoughts about that in the context of these tests that I will share further down. I measured the same five areas from each batch of negatives on a densitometer and recorded the data. I also printed a selection of negatives on Ilford Multigrade RC.
Data
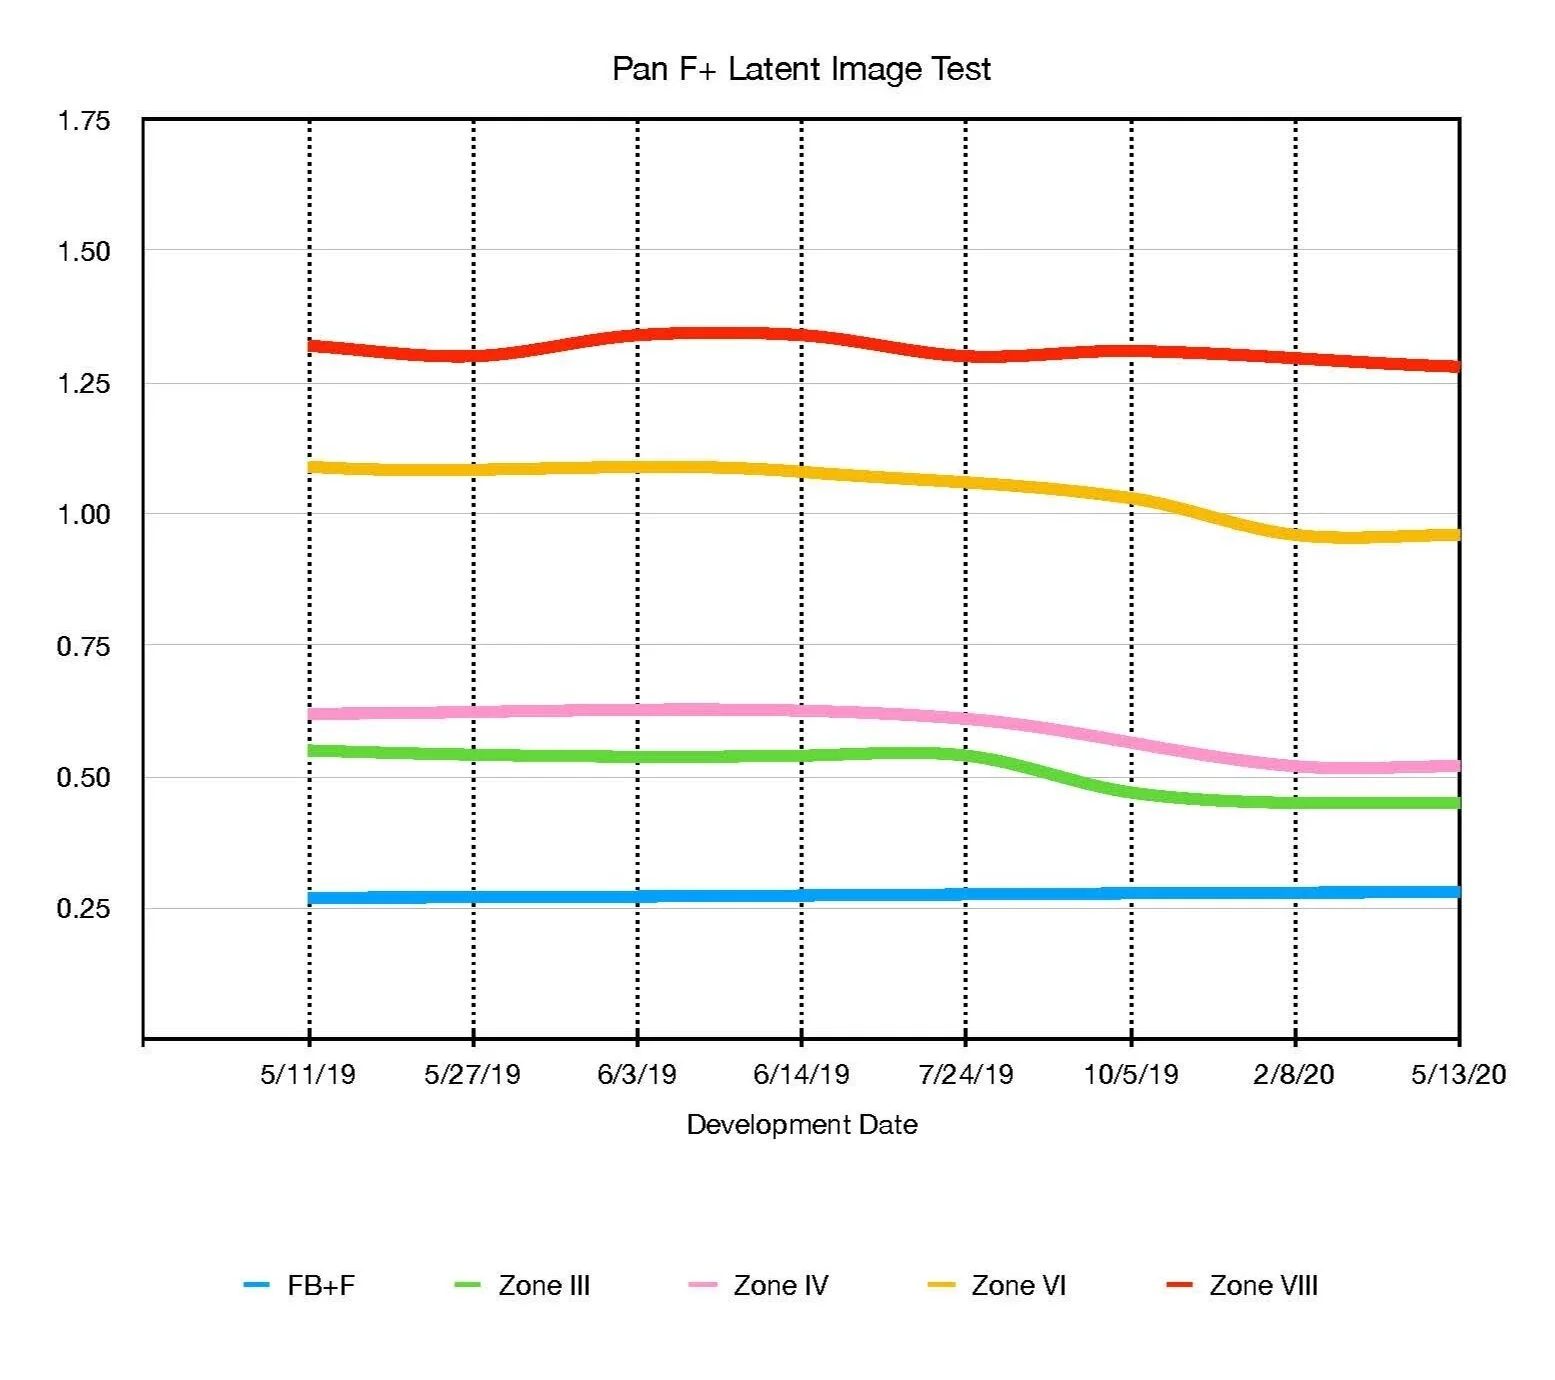

The bottom line in blue is the film base density plus fog. Over the year, it stayed consistent, with a slight lift over the final months. This lift may reflect some age-related fog, but it's very minimal. The green bar represents a zone III shadow density; note how it starts to dip at about the ten-week mark. The magenta bar shows a zone IV density; it too displays a dip at the ten-week point. The orange bar represents a zone VI density. It shows a more gradual dip. The top bar in red is a highlight density in the zone VIII range. It stays stable. Highlight densities are a good indication of development consistency. If this varied, I would blame it on some error in time, temperature, or dilution.
Conclusions
I think what I found lines up pretty well with Ilford's recommendation. There is a measurable difference in shadow area density at about three months, almost equal to a one f-stop change in the low values. So, How critical is all of this? Is latent image degradation the cause? If your roll of Pan-F fell to the bottom of your bag and you've just discovered it after a year, should you throw it away? Should you wail in despair at ever pulling decent prints from your negatives? Please don't do any of that. In the end, what matters is how the photo or scan looks to you. I printed a selection from my test negatives, and I can barely detect a difference between the prints made from negatives developed one year apart. Indeed, when I first reviewed the negatives before taking density readings, I thought they looked nearly identical, and all quite printable.

Start

6 months

9 months

12 months

A brief sidebar
This shift of density in the low values is very much like what happens when you push film. There, you deliberately underexpose and develop the film for longer than the "normal" time. These shifts expand the tonal separation in the mid to high values and compress the shadow areas, increasing the overall contrast, among other things. Many people, 35mm shooters, in particular, prefer this more graphic look. In many images, the content is carried in the mid and high values, while the shadows define shapes and texture. The simplification of tone from a "push" can be quite desirable, suppressing distracting detail and directing attention to the picture's key elements or subject. Yeah, yeah, so why say all of this? These are subjective decisions, but you may find that your sad, aged film isn't so bad after all and that actually, you prefer how it looks.
Back to the question at hand, is latent image degradation the cause? Quite possibly, but other factors could be at work here. My choice of a highly dilute developer may not have been the best one. That bottle of Rodinal has aged one year as well. It's keeping properties may be the stuff of legend, but it doesn't last forever. At such high a dilution, any change in developer activity could have an adverse effect where you need it most, in the shadow areas. So here is a developer takeaway: If you have a roll that has waited patiently for three months or more, choose a developer more suited to holding shadow detail, a developer like Ilford DD-X would be a great choice.
One last takeaway: Shoot Pan-F, it's great. Develop it when you can, but don't stress yourself. You may find yourself pleasantly surprised.
If you do a similar test yourself, I'd love to see your results.

Chaika and me
I wrote something about Orwo 74+ film in a Chaika half frame camera for Emulsive and for some reason they published it. Enjoy!
Attending a party in borrowed clothes by way of an abandoned railroad

Over at Emulsive HQ, they do these happenings called film parties, and this month it was time for the #fp4party which stars as you likely guess Ilford FP-4. I find January a great month to join in on a party as I find I need a little extra motivation to get out in the cold and grey Rhode Island winter to make photos. Saying to a group of folks on Twitter “sure, I’m in” seems to be just enough to get me out and get something done. And so I did.
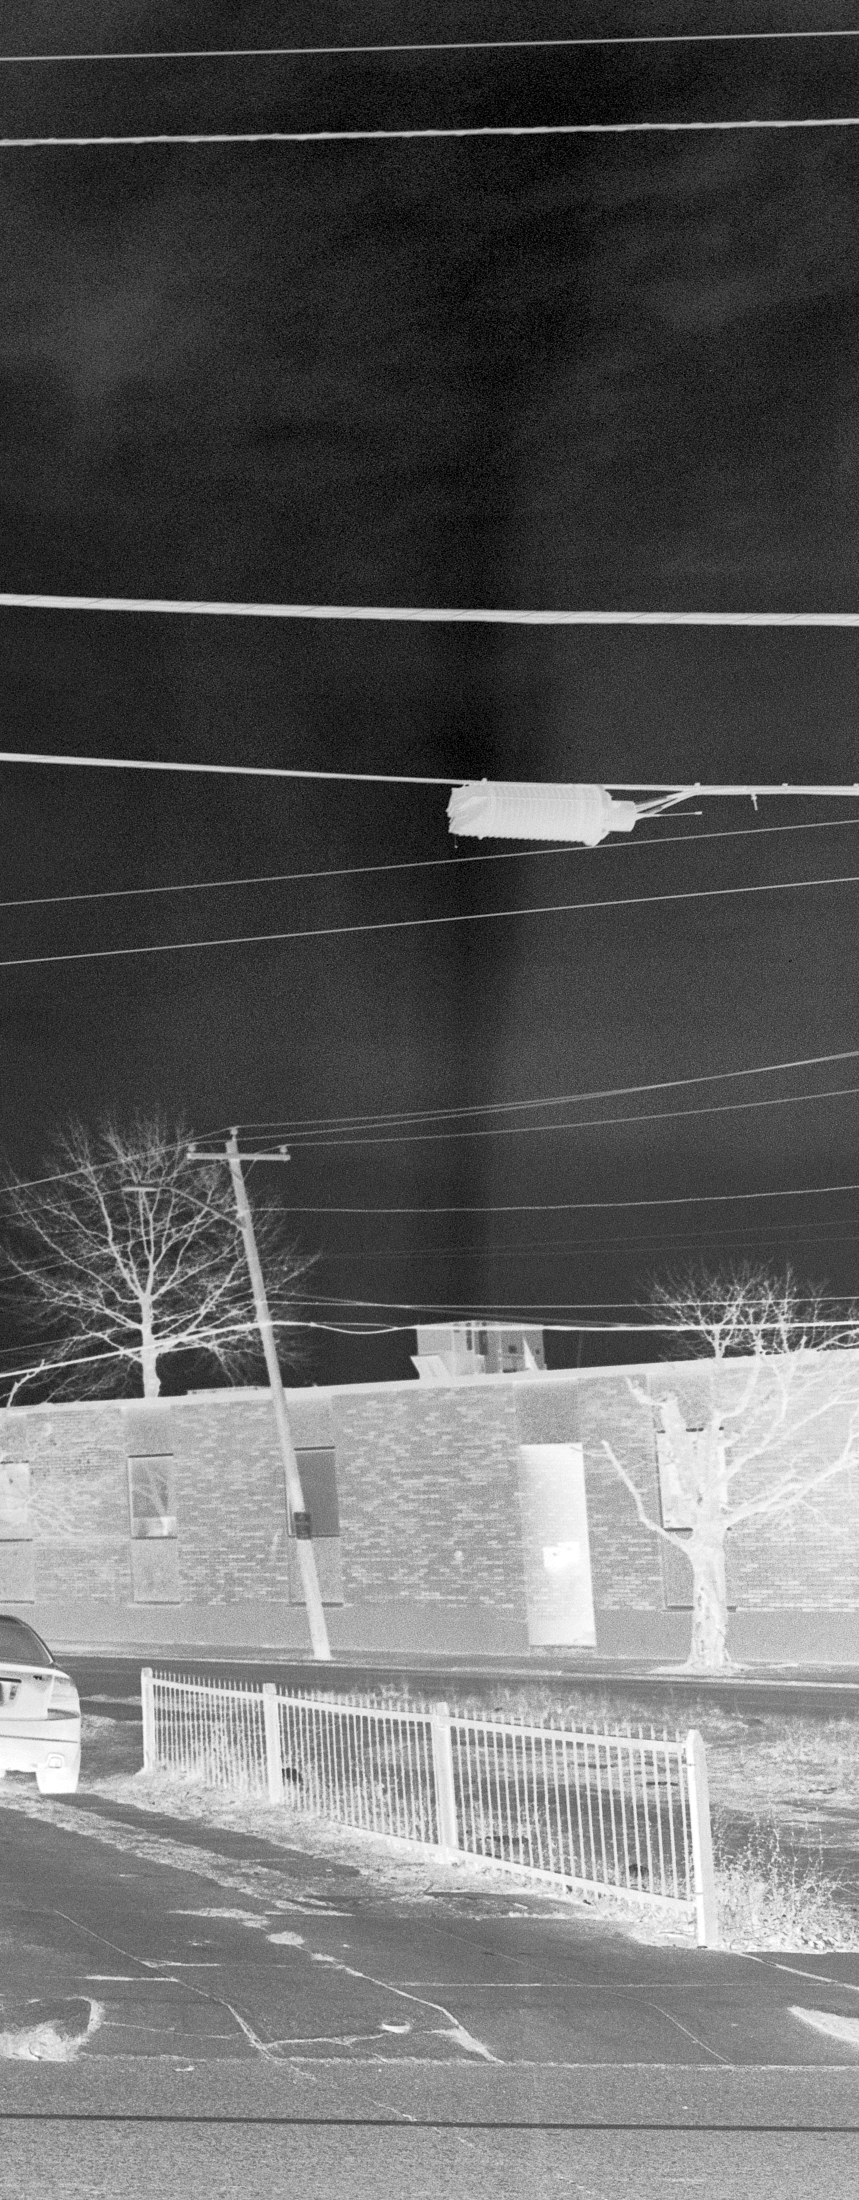
FP-4 is an excellent film full stop. But rather than further my winter of discontent with a cold tripod I decided a more sensitive film would be better suited to my conditions and purpose. I skipped over my usual Tmax 400 and went to the fastest 120 film there is, Ilford Delta 3200. Using which does mean that my images will not be eligible for consideration in the viewer voting at the end of the week but as my dad used to say “we’re not here to win a beauty contest” so I’m good with that. For the tech fans: my film was Ilford Delta 3200 in 120 which I rated at its “data sheet speed” of 1000 and developed in Kodak T-Max developer diluted 1:4. The camera was a Fuji GSWIII 6x9.
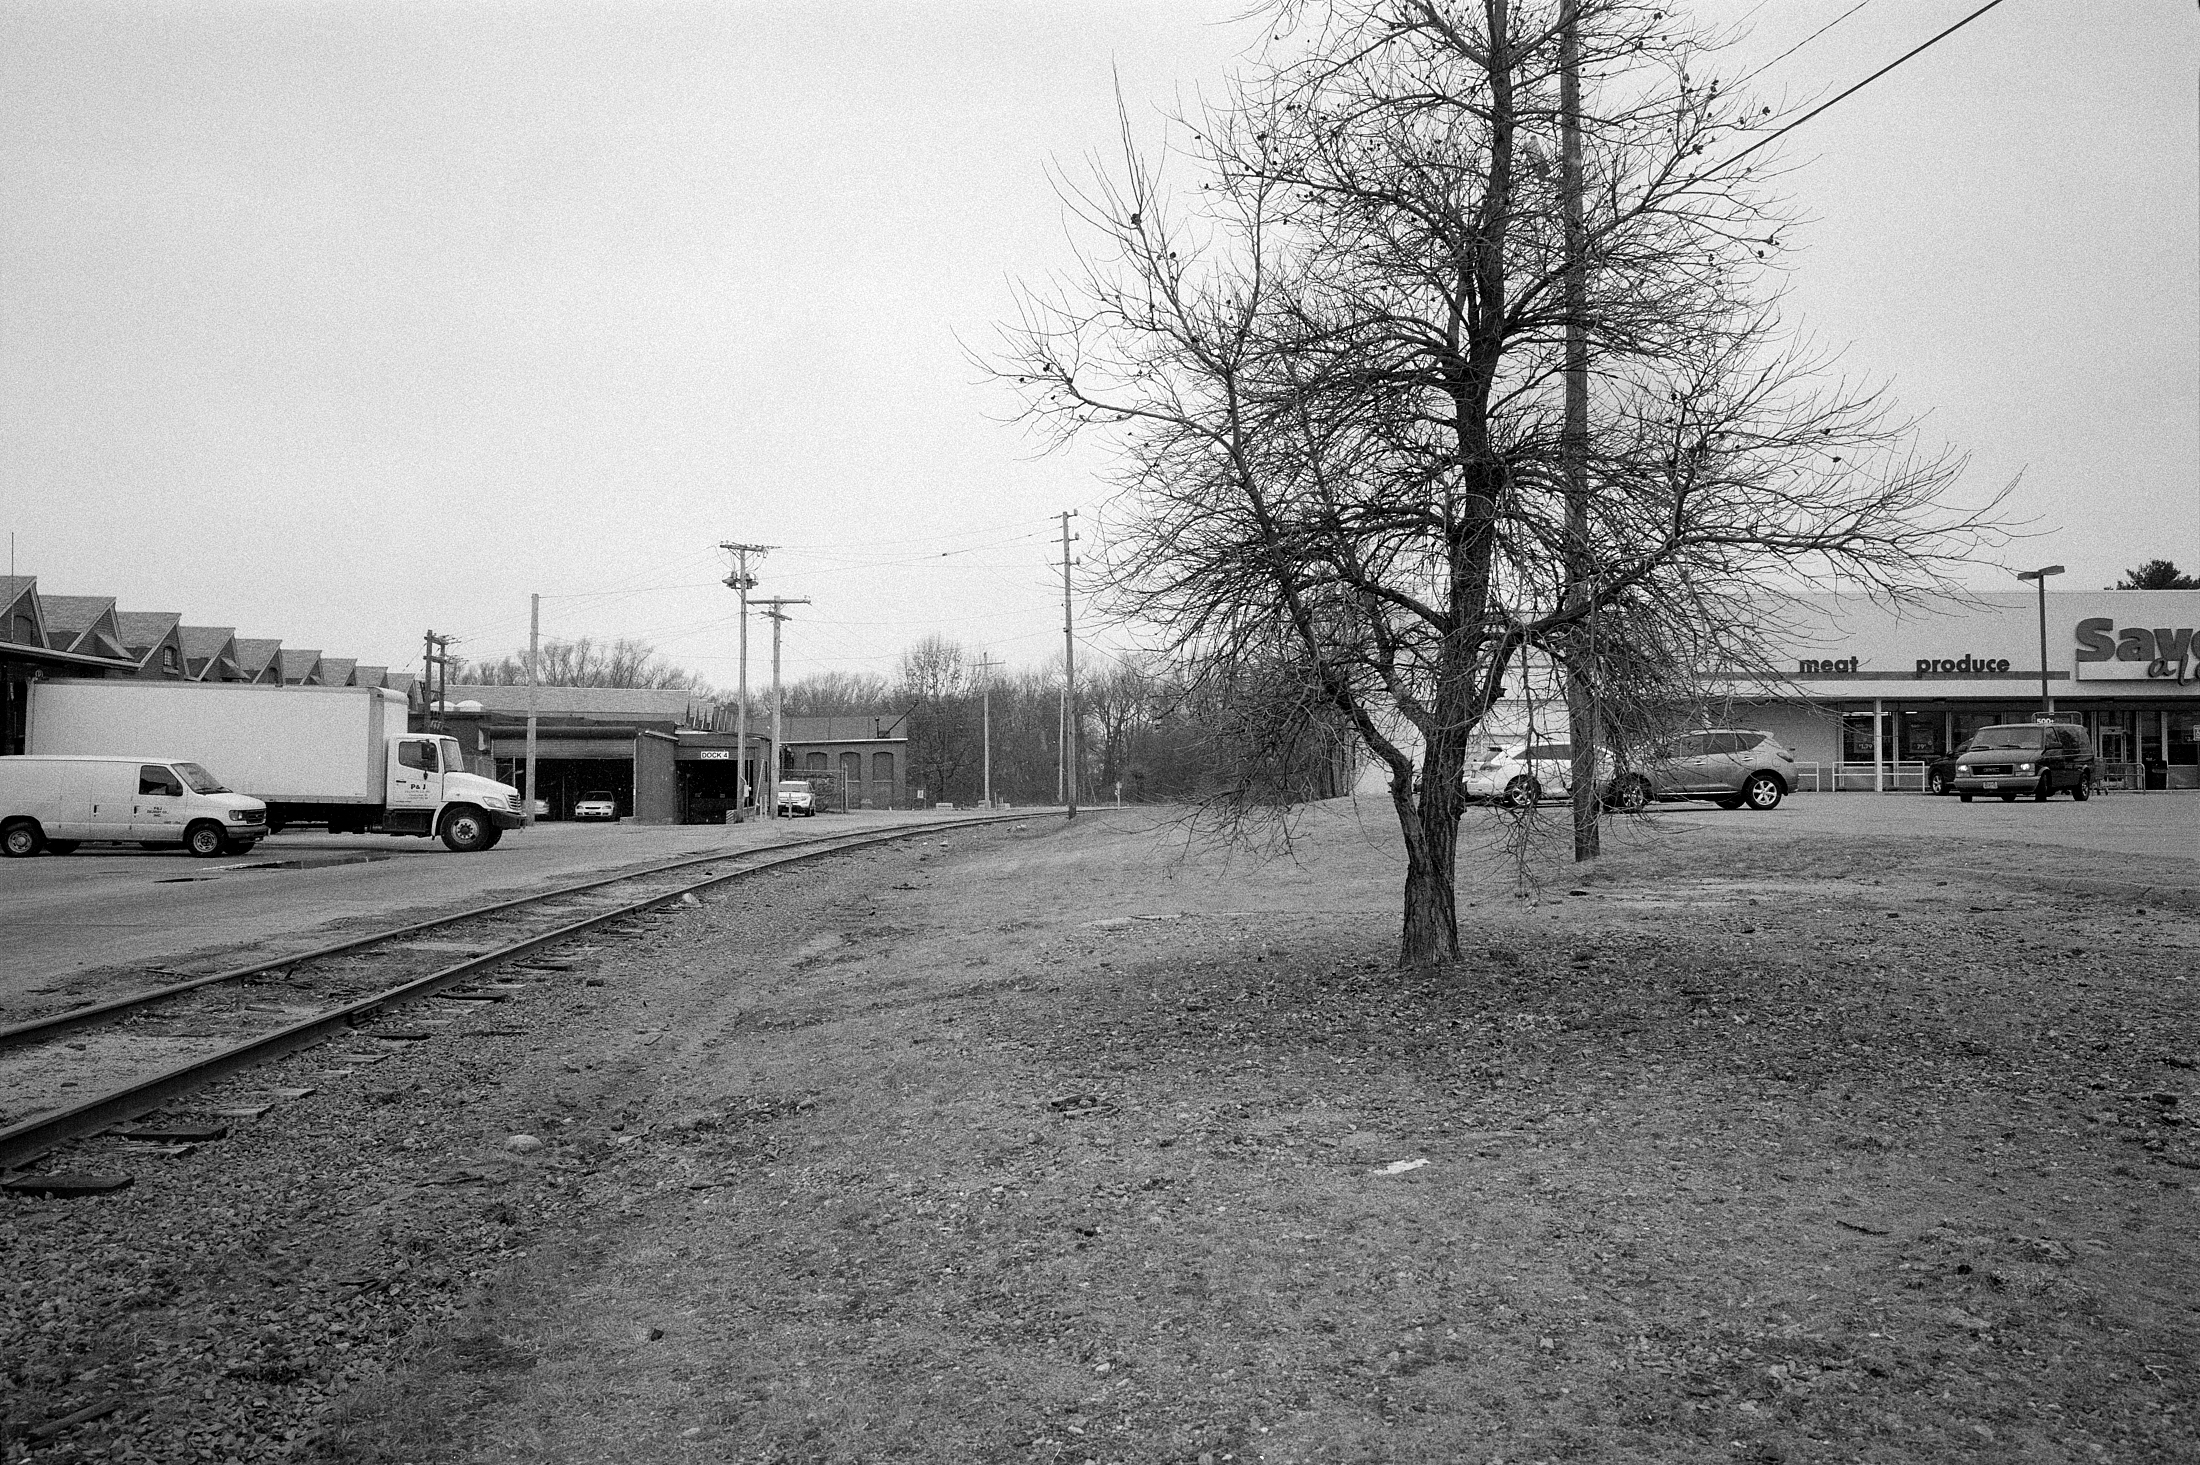
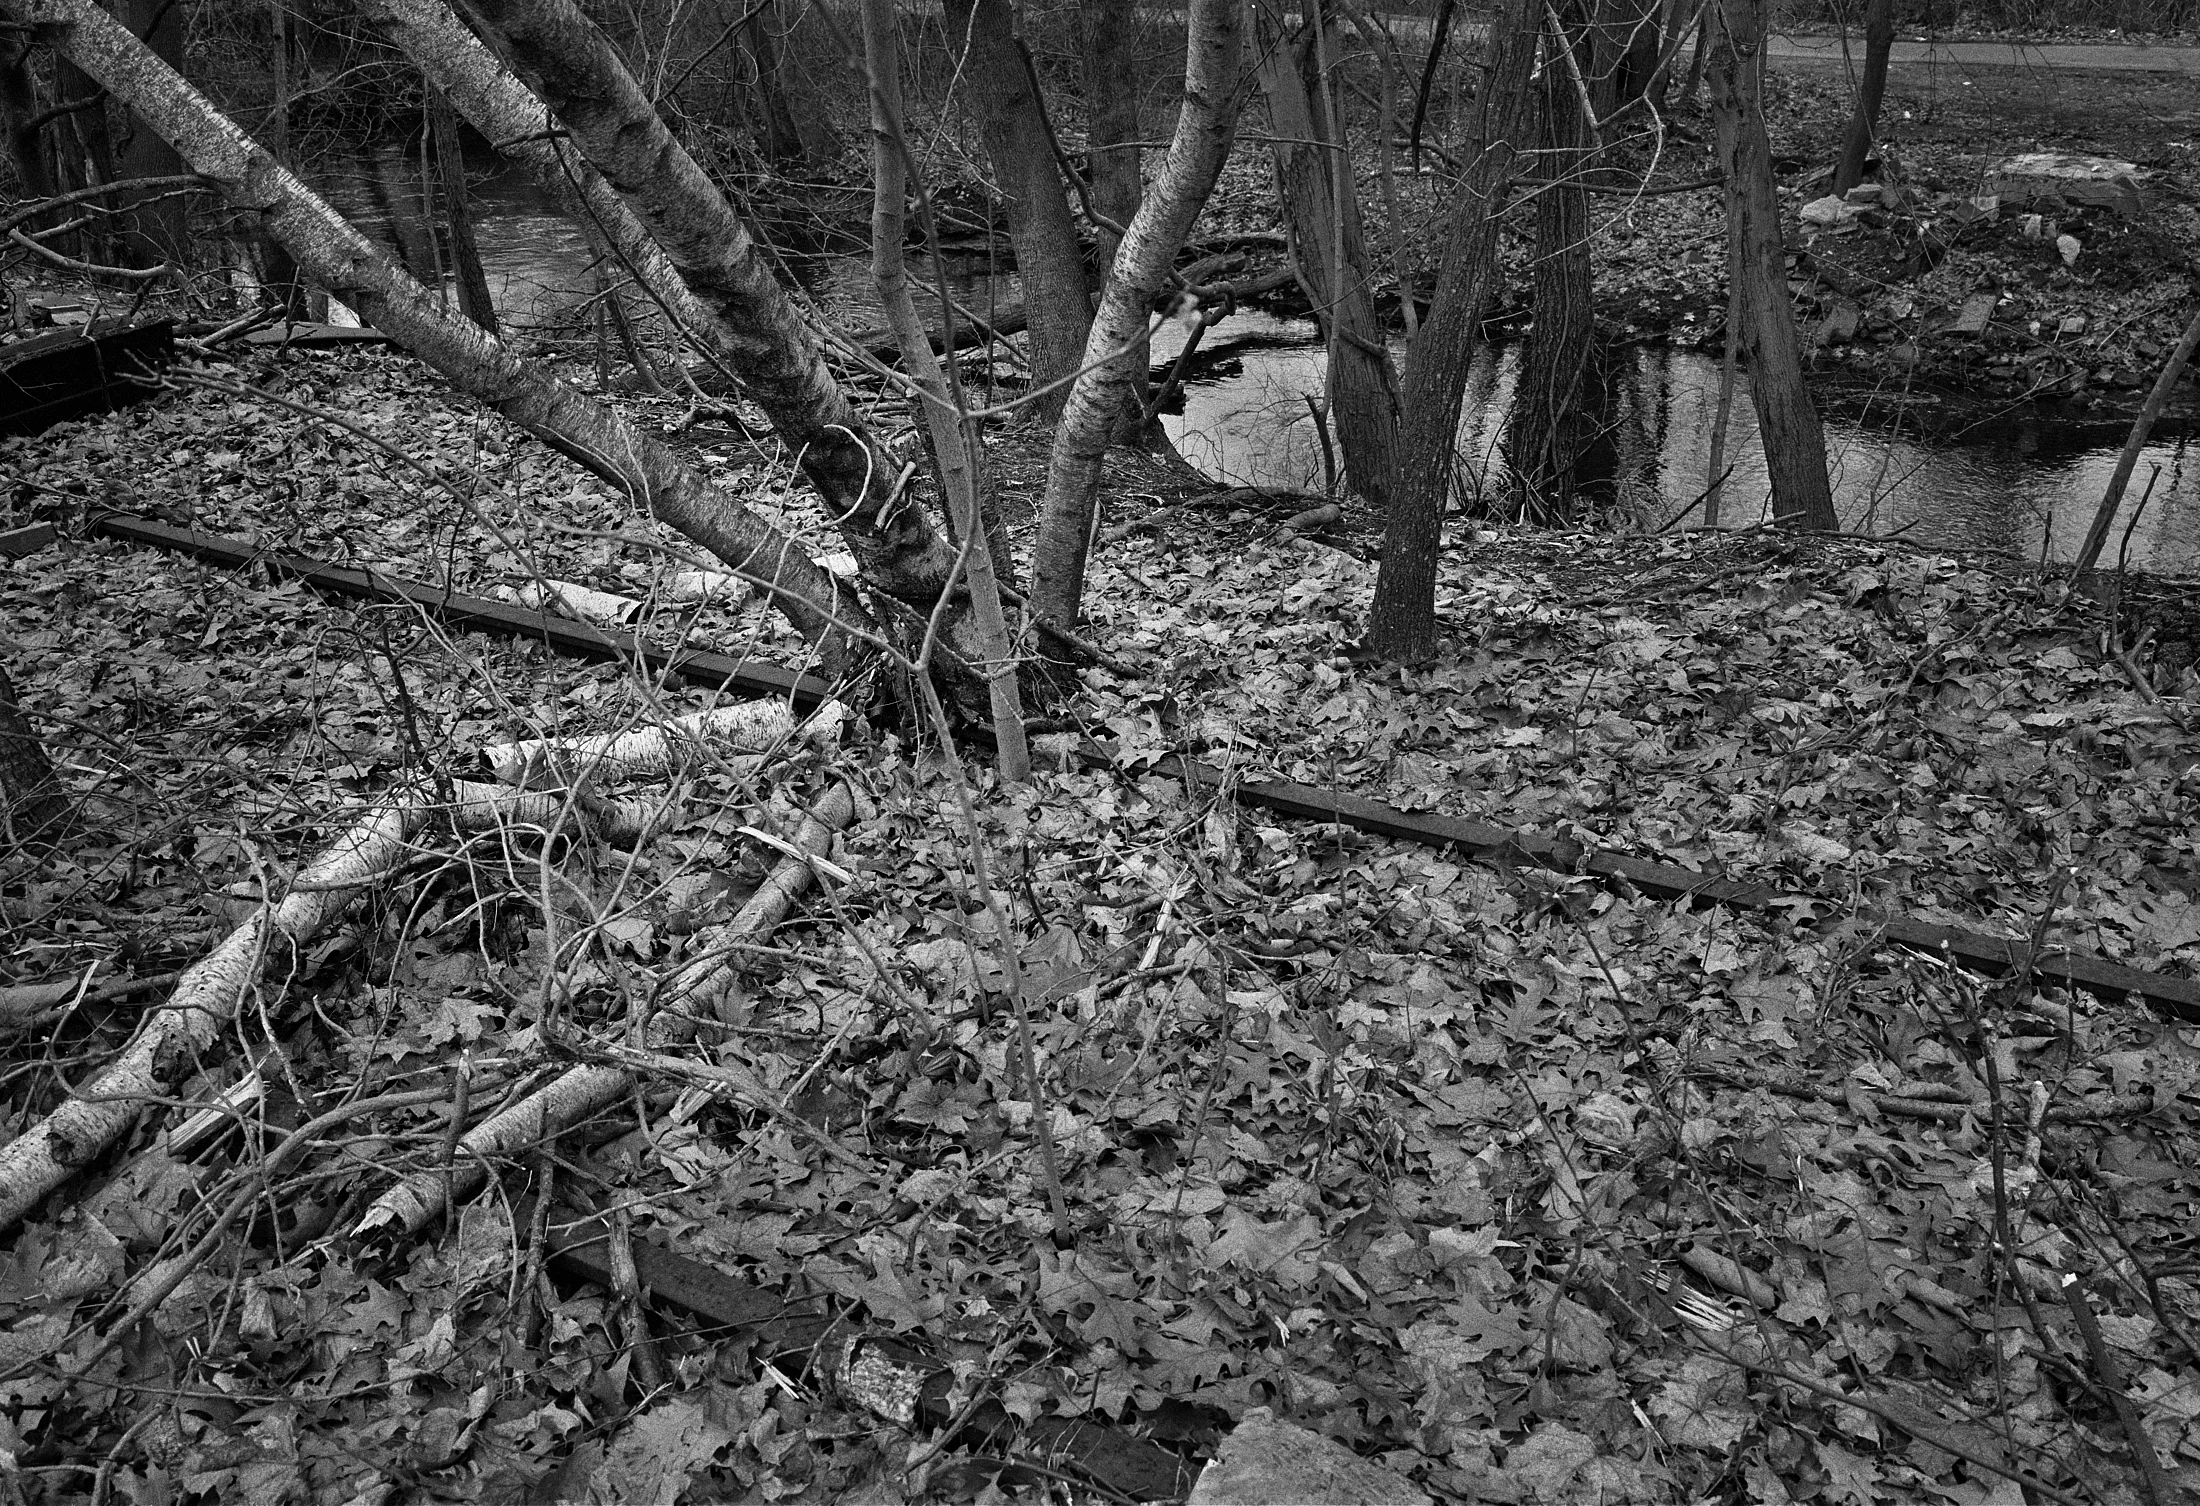
As for my subject, I went to my list of desires to find a walking photo meditation along the rail line of the former Moshassuck Valley railroad in Pawtucket, quite close to home. I first encountered the MVRR without realizing it when I walked the river of that name. After doing a bit of research, I discovered that the diminutive railway had a rather interesting and long history. Although at 2 miles it was one of the shortest in the country it retained its independence from its start in 1847 right up to 1981. It ran passenger service until the 1920s and fought and won a rate dispute with “The Company” the mighty New Haven Railroad. When I learned that an extension was planned (a crucial move in winning the rate dispute) that would have brought the railroad right by my house, I was hooked, and I knew I had to explore this bit of neighborhood history further.
This is just a first effort, but I am encouraged that there is more I can work with. In the spirit of the party and my virtual notebook I’m sharing here every picture from both rolls in the sequence I made them.
The MVRR was folded into the Providence and Worcester Railroad in 1981, and this branch is actually not wholly abandoned. It sees some occasional service. I note evidence here of recent tie replacement and brush clearing, perhaps indicating that the P&W’s new owners still see some value in the line.
For more info: http://www.abandonedrails.com/Saylesville_Branch
And here is a cool home movie of the railroad in use from 1970.


Photograph as a time machine: Emulsive Post →
In case you missed it, I had a post on Emulsive about the enduring power of a printed photograph. Check it out.
Don't Take Pictures feature →
In case you missed it, the lovely Don't Take Pictures magazine did an online feature of my piece on baseball, photography and getting out of a rut. Take a look:
http://www.donttakepictures.com/dtp-blog/2018/1/2/photography-and-baseball
Darkroom Printing Form PDF
By demand and for my own necessities I have recreated my tried and true printing form. I made this years ago in some graphic program that no longer exists and have been making copies of copies all this time.
In use it's pretty self-explanatory. The diagram represents the enlarger with a line for the negative carrier (glass, full neg etc.) and a line for the lens used. I write the image size in the trapazoid shape, and there is a line for the enlarger height.
The boxes on the right are space to doodle the image (if necessary, mostly I just draw key features if at all) and most importantly the burning and dodging pattern. I found out quickly that the back of a print is a really bad place to store this information. I collect these sheets project to project and store them in the negative file, or if the print isn't part of a project, they just live in a file I keep in the darkroom. Not fancy but it works for me. Maybe for you too.
In which I turn it up to 11
Five Frames with Erik Gould on Emulsive.org
Read MoreHaving issues: defeat streaky development in 2017
Develop your own film? Here's a common development issue that can pop up from time to time. It's a streak of extra density running across the short dimension of roll film, visible especially in light areas such as the overcast sky seen this example. It can happen with both 35mm and 120 size film, this one is on some 120 Ilford FP-4+. I've cranked up the contrast a bit in the scan to make this devil more obvious.
In the negative...

As a positive.
What is the cause? This problem occurs during the initial seconds when developer is being poured into the developing tank, especially with 4 or 8 35mm reel size tanks. As the tank fills developer comes in contact with the film before the reel is totally immersed. The time between contact and full immersion is long enough for development to begin in the area of contact. This creates uneven density in an area where it should be uniform. Not good.
Happily I can think of many solutions to this problem. Let's dive in.
- 1. Get fundamental. First thing is to to check your pour technique. You should be aiming to have the tank filled within 15-20 seconds. Tip the tank slightly as you fill to allow air to escape and then pour pour pour. Then cap the tank and agitate with vigor. If that doesn't work:
- 2. Give up. Send your film off to a lab and let someone else worry about it. Upside: More time to do other things. Downside: additional expense and the loss of control over a crucial part of your work process.
- 3. Give in. Accept that an occasional streak or spot, bleep or bloop is just a natural part of an organic process and just proves that your pictures aren't made by an unfeeling machine but by a flesh and blood person keeping it real. Downside: some people won't get it and will just think you're sloppy.
- 4. Give over. Figure that it will happen once in a while so shoot only dark and busy images that will hide a random streak, or if you do wish to photograph some lovely light grey tone, take a page from your cousin the "professional" photographer and spray and pray. Downside: wasting film and becoming your cousin.
- 5. Modify. Change something in the hope that the problem will go away. For instance try a different film type. Maybe HP-5 will be ok if FP-4 wasn't. Downside: giving up on a film that you otherwise like, creating limitations for yourself as you eliminate film types one by one, still experiencing the issue since in fact you're not actually addressing the problem.
- 6. Slow down. Change your developer or developer dilution so it's less active. In theory this will give you more time before development begins. Downside: Development time is longer. There may be changes in image quality that you may not care for. Difficult to know how much dilution is enough before you risk exhausting the developer.
- 7. Scale down. Develop all your film one roll at a time in small tanks. Downside: takes much more time that you might wish to use to do other things.
- 8. Scale up. Get a processing machine like a Jobo. Downside: expensive, takes up more space, not very portable.
- 9. Presoak. You will find a fair amount of debate over the efficacy of presoaking your film in water. On the one hand the manufacturers say it's not necessary as modern films have incorporated surfactants to encourage even development. On the other hand many people have had complete success using a presoak, including Ansel Adams. Jobo recommends a presoak for their rotary process. The theory is that a presoak will encourage even development as the water absorbed by the emulsion will be displaced by developer slowly, with the added benefit of bringing the tank to the process temperature.
Personally I used a presoak for many years (largely because of Ansel's recommendation) with little issue. Oddly, one issue I did have was with X-tol developer in a rotary Jobo processor, I was getting the dreaded "wagon ruts", bands of uneven development running the length of the film. Jobo support recommended skipping the presoak which did in fact eliminate the problem. But I digress. For many years now I've not used a presoak but I feel pretty safe in saying that there's little risk if you do. Downside: one more step added to the process, some small adjustment in development time may be needed.

The handy lifting rod.
- 10. Get a lift. This one requires the fewest changes, but does require that you develop your film in an actual dark room and have a second developing tank on hand. A lifting rod is very useful, but not completely necessary. For the big 8 reel tanks (and larger!) this is the best method to ensure not only even development but to be certain that the film on the top of the tank is being developed for the same time as the one on the bottom.
How to? Place your loaded reels into one tank, using the lifting rod if you have one. Fill the second tank with developer. Turn out the lights, open the film tank and lower the reels into the developer, smooth and steady. Cap the tank and agitate as normal. Now you can switch on the lights and continue as usual. Downside: you need a darkroom.
Issues with film development can creep into the process of even the most careful worker, or lab. Hopefully one doesn't cost you a once in a lifetime image. If you take the time to understand the problem and to review the fundamentals you should be back up and running with confidence in short order.
Why it's good I'm not a doctor
Getting a problem wrong and then right.
Read MoreFrom the Archives: Reading the signs on Allens Ave.
"Give me your license and meet me there".
Read MoreI use the word "paean" and mean it.
I wrote a little piece about one of my favorite materials for Emulsive.
“There’s mystique about them; smooth, finely grained, challenging. Something for the true pros and “serious types”...”

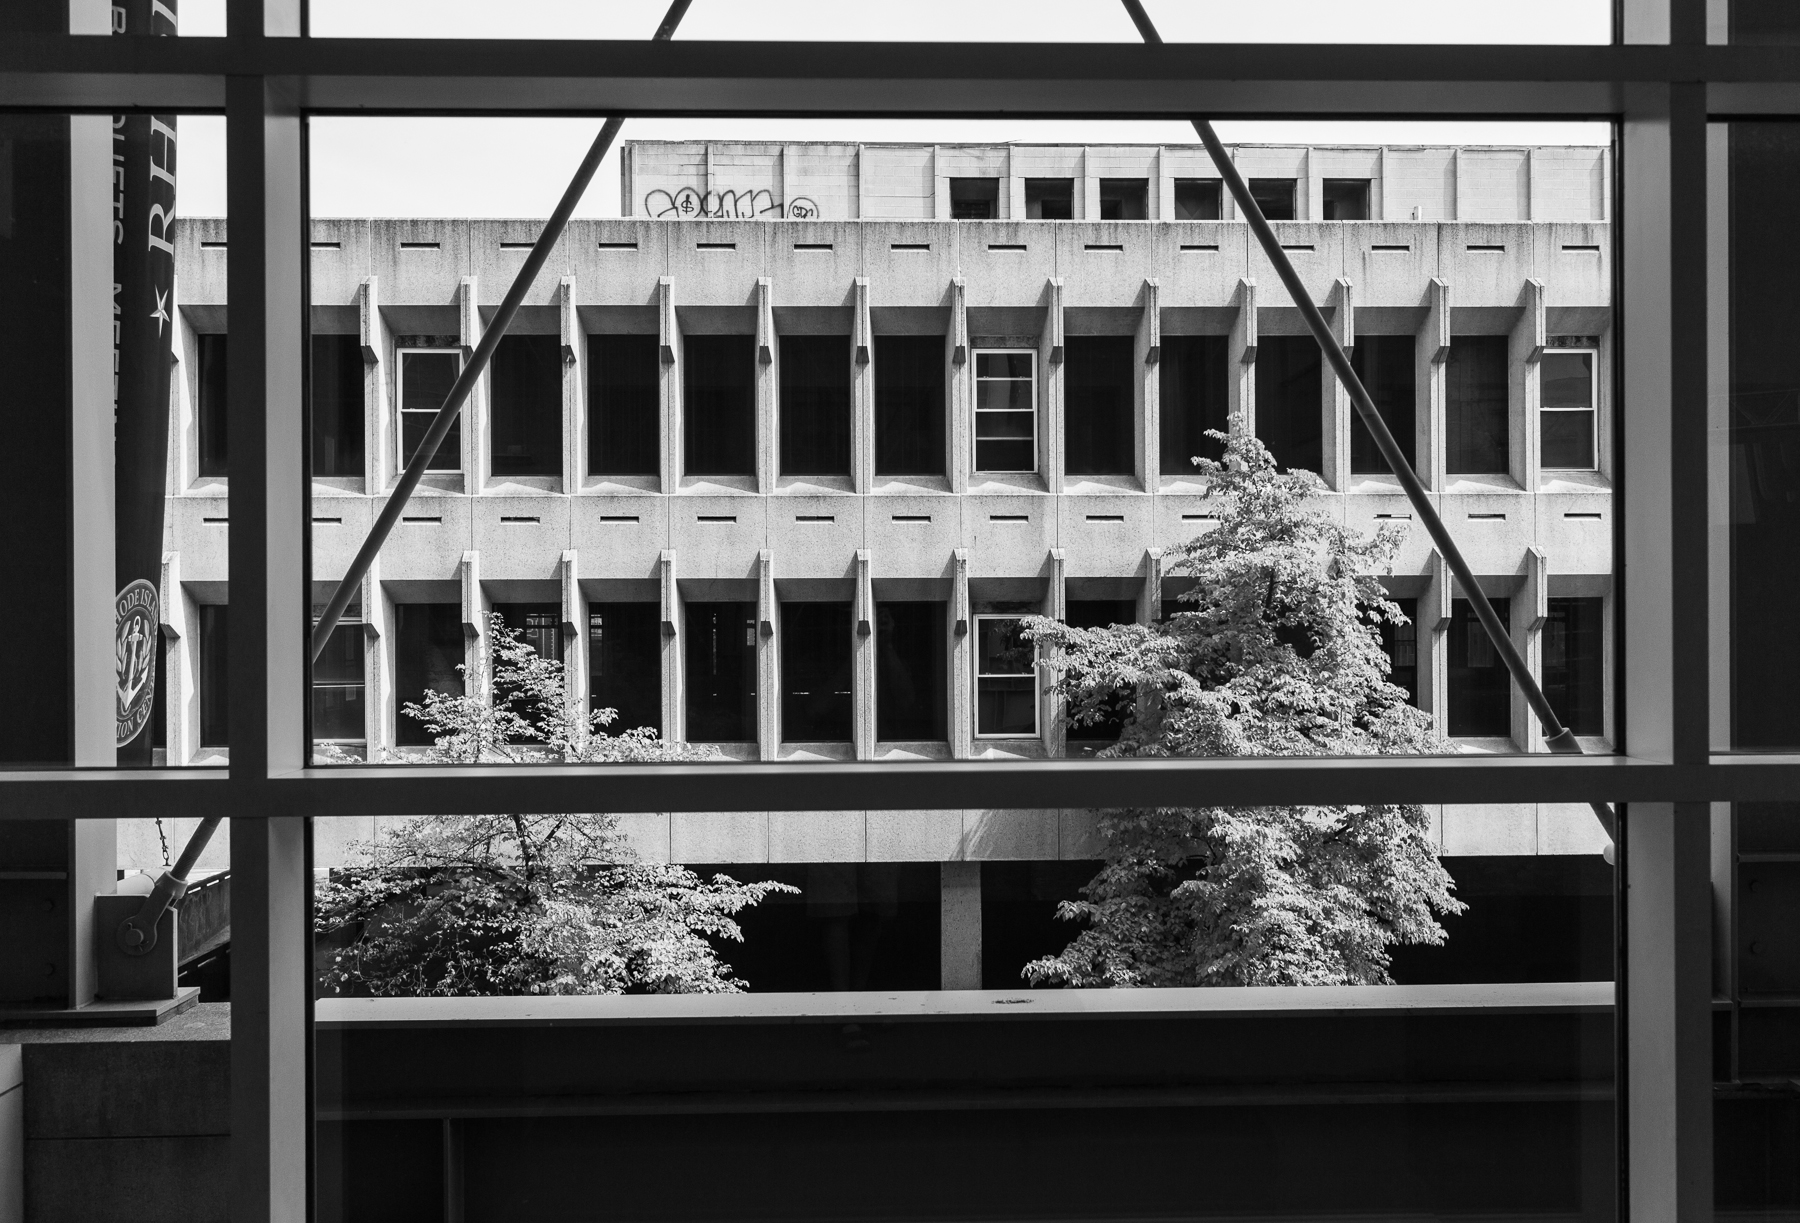
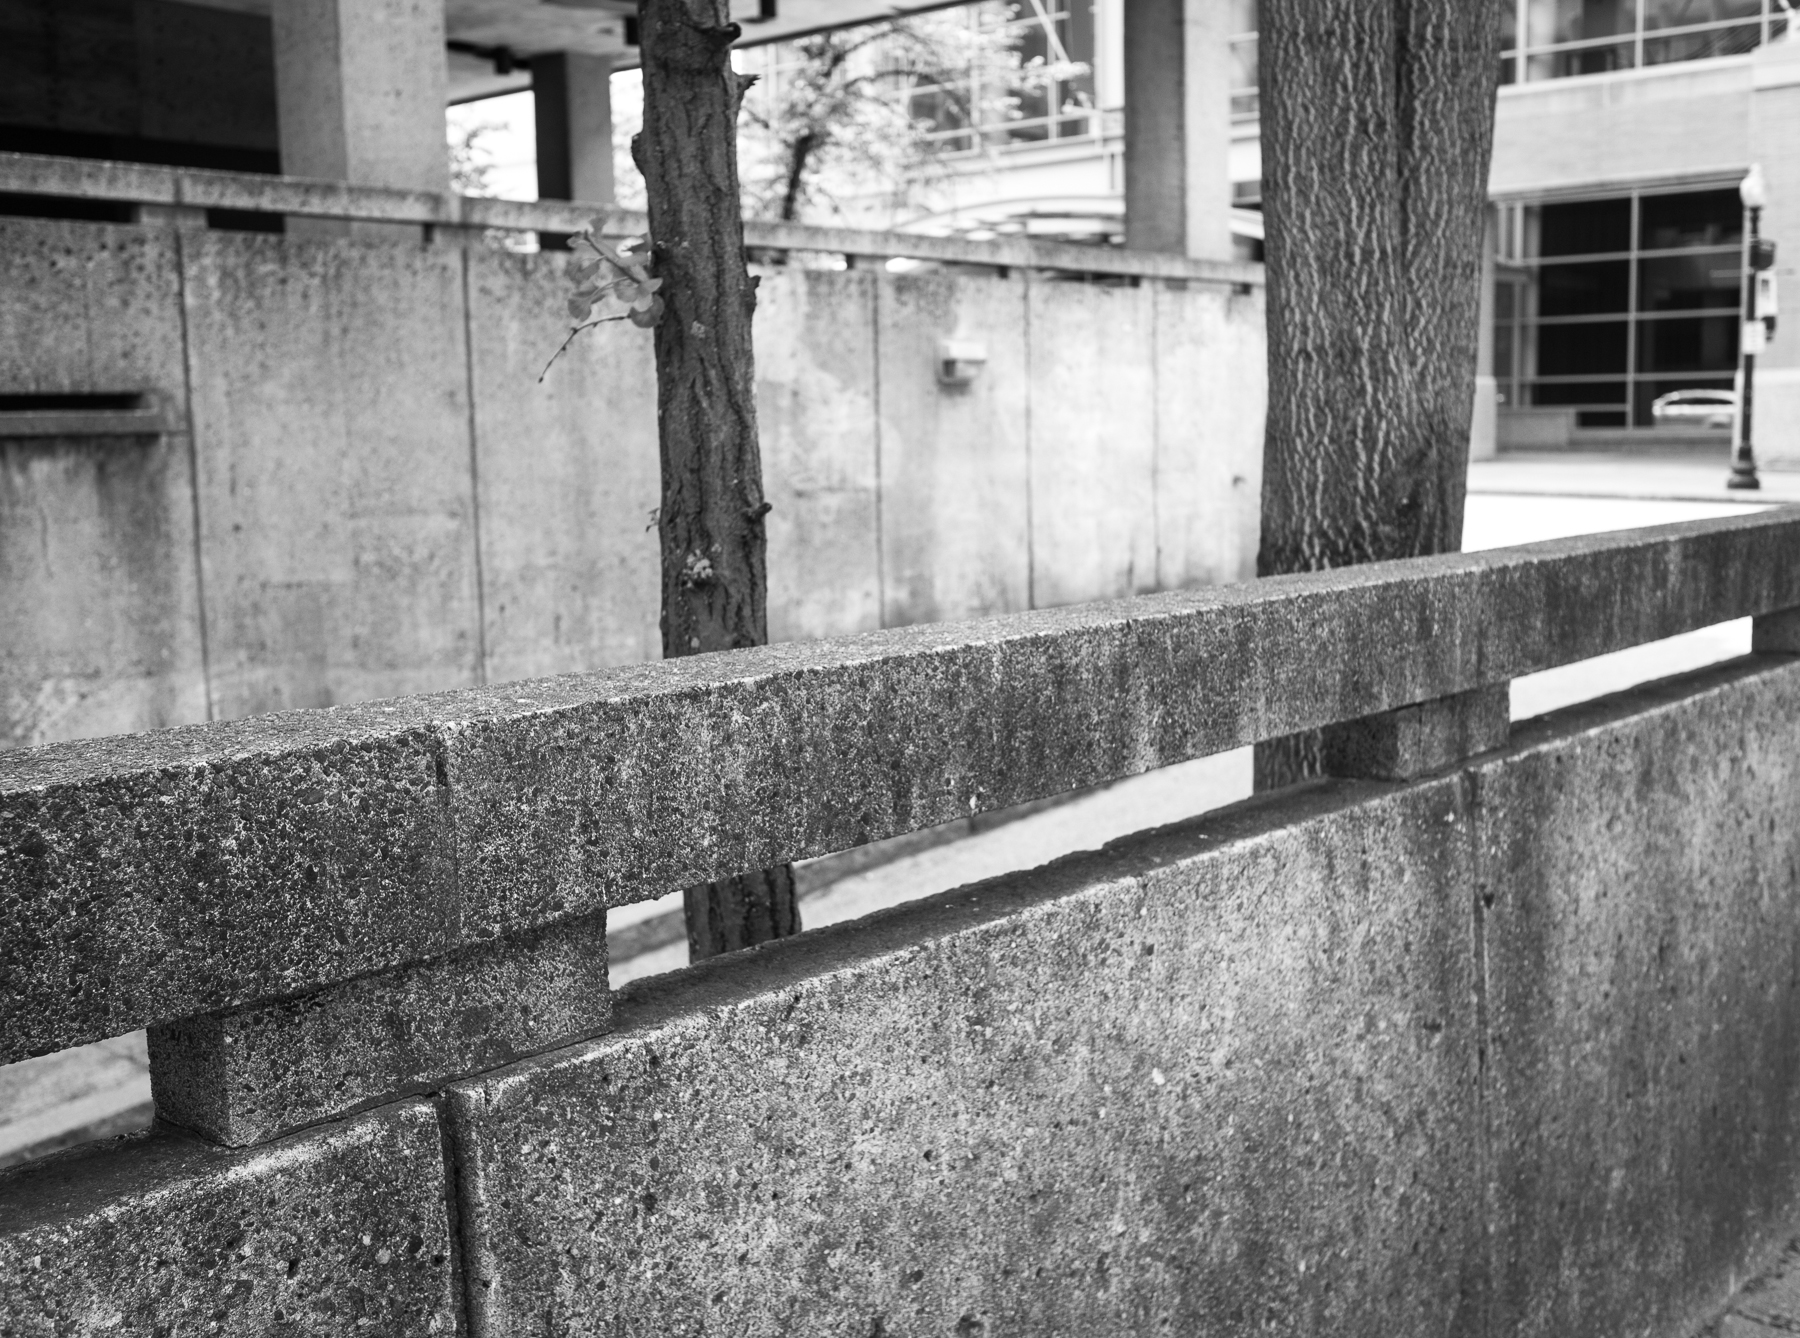
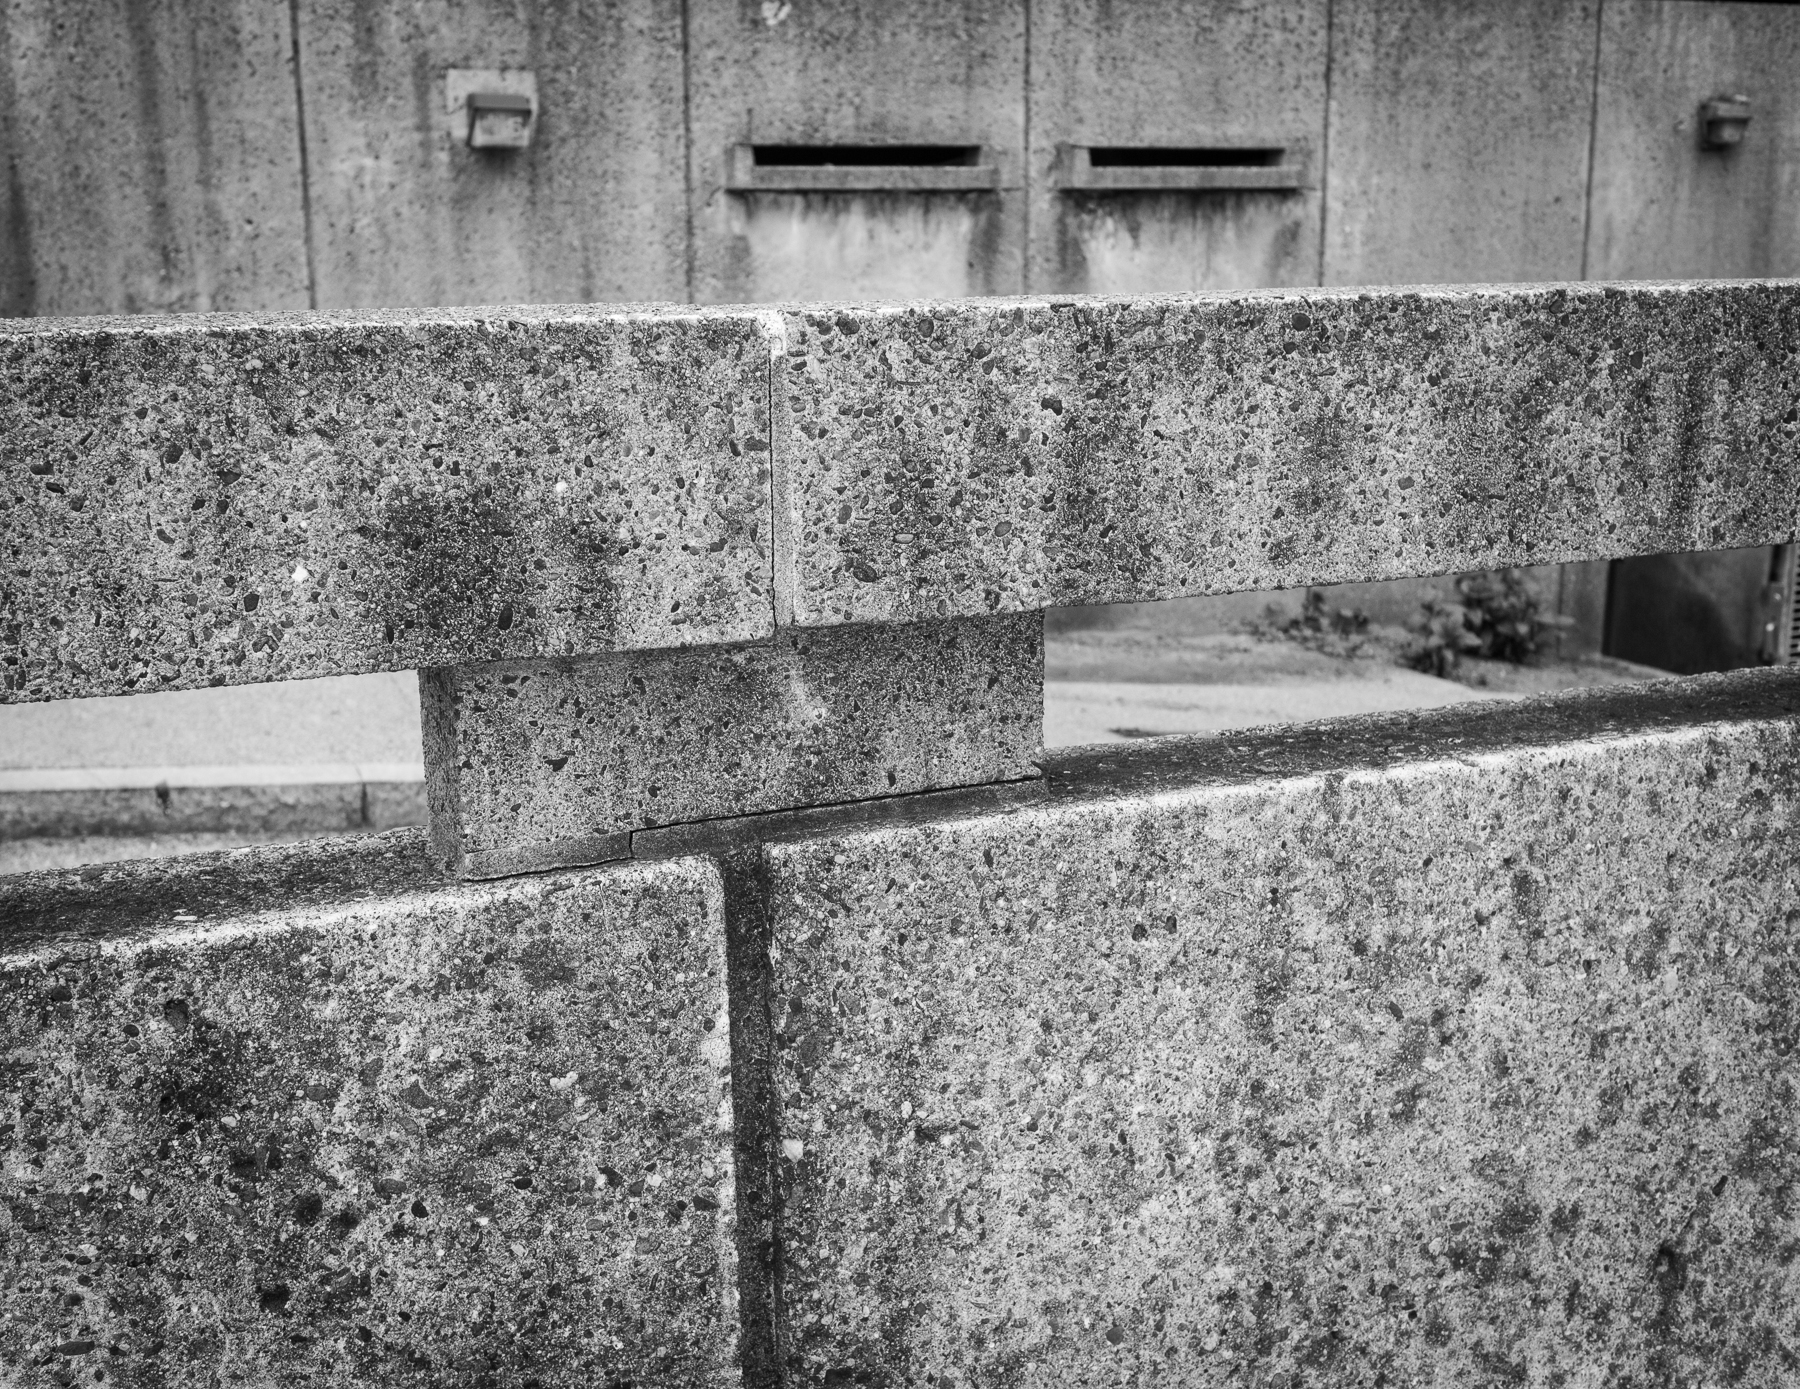
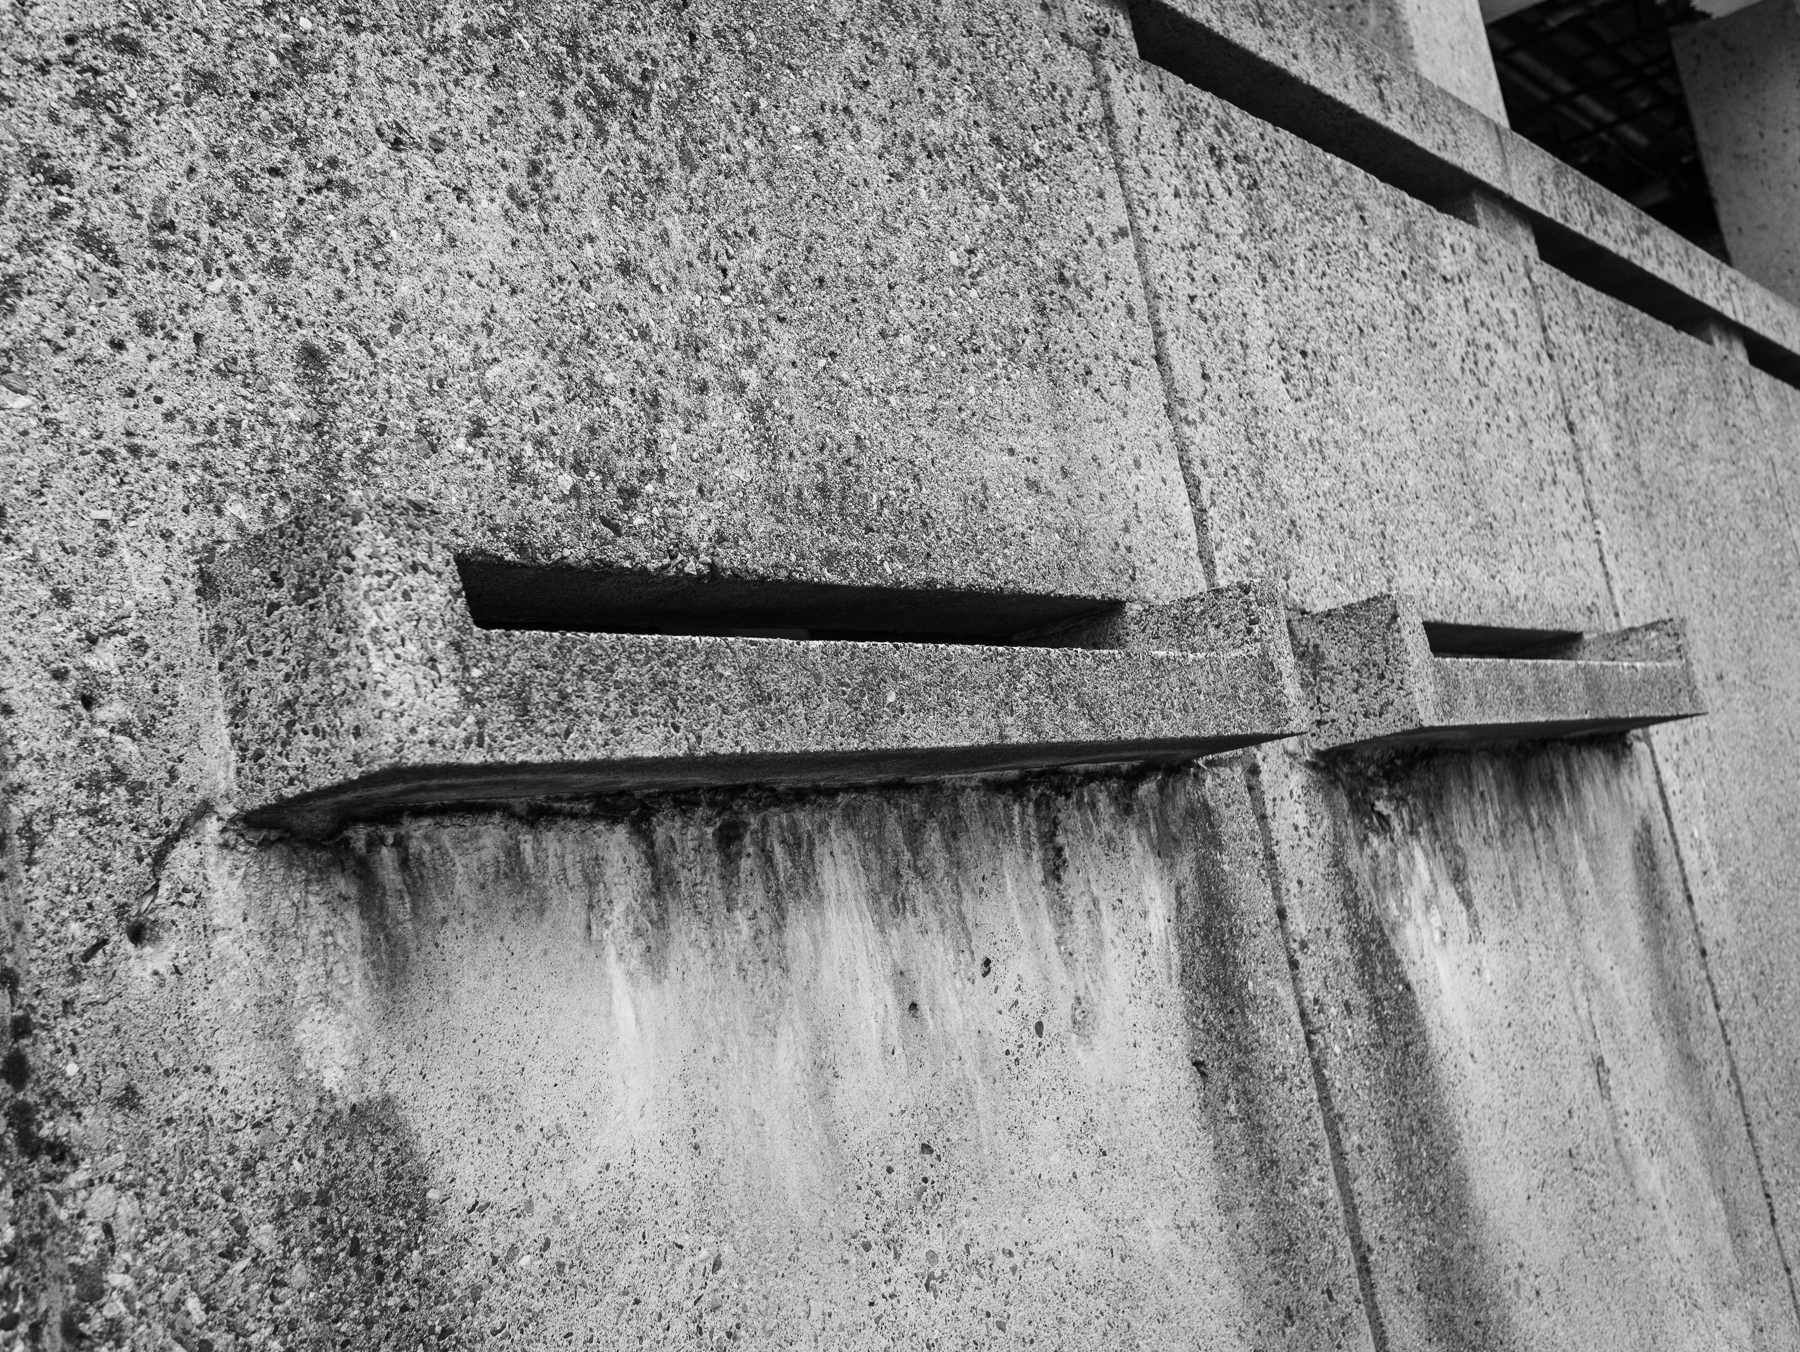
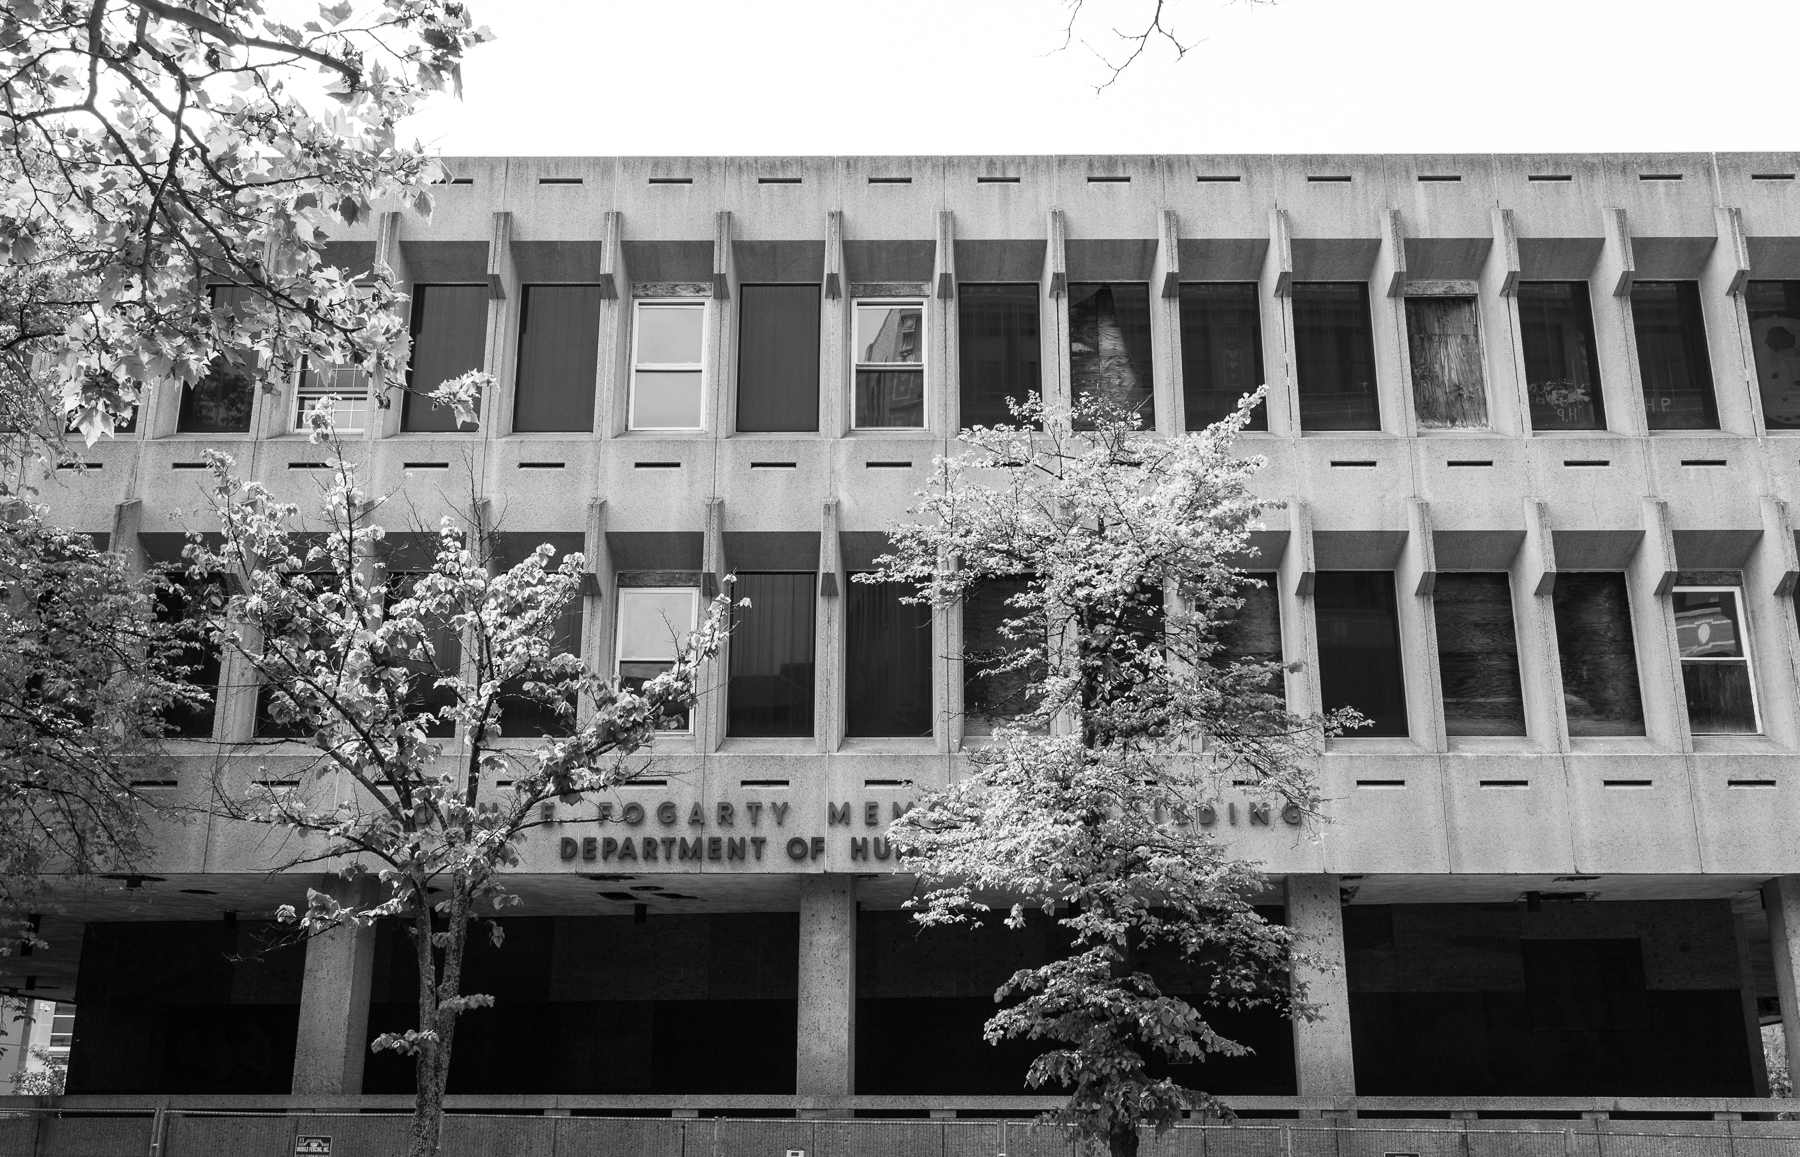
Brutal and Unloved
Sketches towards a photo essay on the doomed Fogarty building, Fountain Street, Providence.
Read about it here.


Photography and Baseball [metaphors]
Today is the first day of the baseball season and although it's snowing and many games on the east coast have been postponed it still makes me excited. Excited for the baseball season? Nope, don't really care about that. I get excited for the photography season.
Graveyard, Douglas Ave, Prov. 1994
When I was young and could indulge in such fanciful notions I had this idea of aligning my photo season with the baseball season. Training camp opened and I would go through my gear, do some film testing and generally get myself ready to get out there. In these years I was doing most of my own work with a view camera, and I didn't shoot that often in the winter. (I don't really like snow pictures and don't often do them. Here's a rare exception, from 1994 4x5 FP-4)
So the baseball season would start and I'd get out there and start working. Hopefully by the All-Star break things would be going along well, shooting, processing, seeing the field. Going well or not it was a moment to reflect and to see what was needed to make the most of the rest of the season, knowing that the fall light lay ahead. I never made the payoffs and I never won the pennant but I kept at it until winter. I don't really know how that came about as I'm not really a baseball fan of any seriousness, but these days I don't let myself take the winters off.
Going year round can generate a lot of self-inflicted pressure, and that pressure can in turn put up creative blocks that need to be overcome. I've developed a tactic for that that seems to have taken the form of another sports metaphor: the change up.
The change up can simply mean picking up a different type of camera, or shooting different film. It can be changing modes all together, perhaps listening and recording audio or sitting down with a notebook and writing. Once when I was feeling especially frustrated and completely lost I gave myself permission to give it up and just write. Which I did for about three months. When I picked up a camera again it was because I was excited to do something with it, I was inspired again. I knew that photography would be there if I needed it and as it turned out I did and it was.
There are times I will shift from one project to the next and that can bring about a new set of problems but I'd rather that than feel I was pounding my head on a wall or just going through the motions. Identifying a habit and then doing the opposite can be a great change up. Avoiding people? Go shoot portraits. Only like sun? Go shoot in the rain.
Maybe photo projects have their own seasons, certainly they their own internal rhythms. Stay flexible and you can move with them too. So get out there, give it 110%, leave it all on the field, take it one picture at a time and bring home a pennant. Whatever that is.
The ghosts of edits past
Editing a project for a show or a book has it's stages, from shooting, which may continue well into the editing stage, to the initial selection from contact sheets, printing, sequencing, more printing and then on to book layout or exhibition hanging.
When it comes to sequencing, I've found no better way than working with actual prints, laid out on the table or the floor, shuffling and shifting until the rhythm is right. Digital or film, it doesn't matter, you need the space to see it all together flowing from one image to the next.
The hardest aspect of any edit is the cutting away of things you like and have become attached to. It starts out fairly easily but eventually you get to where it hurts, and you agonize over each choice. But choose you must and (hopefully) the sequence shows you what it needs most. The deadline looms, you convince yourself it's right and up it goes.
It begins...
Sequencing underway...
We have an edit...

On the wall for all to see.
You pack up the outtakes, hang the show, make the book and move on. Sometimes those outtakes linger with you, like ghosts popping in unexpectedly until finally you go back to that box and have a visit. Some, you admit you still like. Some give you ideas for new work. Thanks to the miracle of modern digital media you can put them up and excise your ghosts. And so I shall. These are outtakes from Canonicus' Bow.


An alternative approach to contrast control with HC-110
When developing film, vary dilution with HC-110, not time and get the contrast you want.
Read MoreFormer site of Fruit Hill School. 2015
Field Notes: Photographing what's not there.
Making the photographs for the 2015 Most Endangered Properities show.
Read More